How to Turn on Virus Protection in Windows 7
Z7_3054ICK0KGTE30AQO5O3KA30N0
hp-concentra-wrapper-portlet
![]() Actions
Actions
HP PCs - Using Windows Defender to Prevent Virus and Spyware Problems (Windows 8)
This document applies to HP and Compaq computers and tablets with Windows 8 and Windows Defender.
Windows Defender helps protect your computer against pop-ups, slow performance, and security threats caused by viruses and spyware. This type of malware can infect your computer without your knowledge: it might install itself from an email message, when you connect to the Internet, or when you install certain applications using a USB flash drive, CD, DVD, or other removable media. This document explains how to scan for and remove malicious software using Windows Defender.
Windows Defender helps to prevent malware from infecting your computer in two ways:
-
Real-time protection. Windows Defender notifies you when malware tries to install itself or run on your computer. It also notifies you when applications attempt to change important settings.
-
Scanning options. You can use Windows Defender to scan for malware that might be installed on your computer and to automatically remove (or temporarily quarantine) anything that is detected during a scan.
note:On some HP computers, Windows Defender is already installed, enabled, and is running automatically.
note:If you are not using the latest version of Windows 8, some graphics and information in this document may vary. You can get the latest version from the Microsoft Store.
Enabling Windows Defender
To enable Windows Defender, connect to the Internet and perform the following steps:
-
From the Start screen, type Windows Defender to open the Search charm, and then select Windows Defender from the search results.
Figure : Search results for Windows Defender

The Windows Defender application opens.
note:
If you get an error message indicating that Windows Defender is not protecting your computer and you are not able to open the Windows Defender application, please continue to the next section at this time.
-
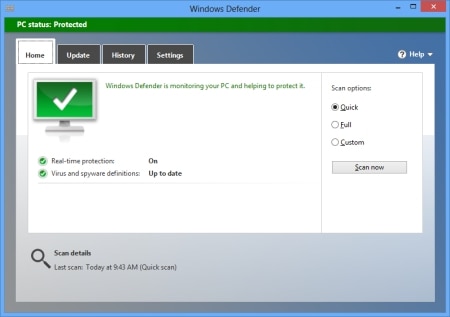
If a PC status: Protected message displays at the top of the window, Windows Defender is enabled and Real-time protection is on.
Figure : PC status: Protected message

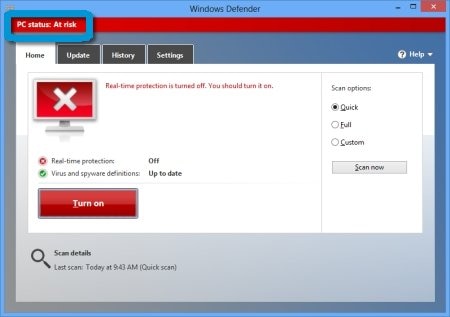
If a PC status: At risk message displays at the top of the window, Real-time protection might be turned off. Go to the next step.
Figure : PC status: At risk message
-
To enable Windows Defender, click the Turn on button.
Windows Defender window displays the PC status: Protected message.
Unable to activate Windows Defender
If you are unable to activate Windows Defender and you get an error message saying that Windows Defender is currently not protecting your computer, it may be because your computer still has a different antivirus application installed. To resolve this issue, remove the old antivirus software before enabling Windows Defender. If you need help uninstalling your previous antivirus software, refer to the HP document Uninstalling Software (Windows 10, 8).
After uninstalling the antivirus application, you will be prompted to restart your PC. Restart your PC and then use the following steps to enable Windows Defender:
-
From the Start screen, type action center to open the Search Charm, an then select Action Center from the search results.
Figure : Search results for Action Center

-
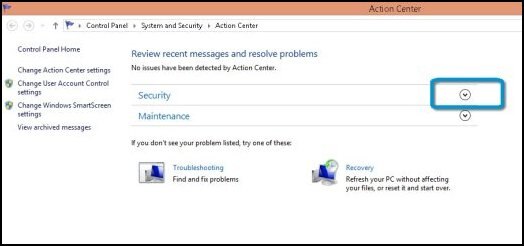
Click the arrow in the Security category to expand the list of security items.
Figure : Security section of the Action Center window.
-
Click Turn on now next to Spyware and unwanted software protection or Virus protection to enable Windows Defender
Figure : Security items of the Action Center window

The Windows Defender application opens.
-
Check if Windows Defender is enabled.
If a PC status: Protected message displays at the top of the window, Windows Defender is enabled and Real-time protection is on.
Figure : PC status: Protected message

If a PC status: At risk message displays at the top of the window, Real-time protection might be turned off.
Figure : PC status: At risk message

-
To enable Windows Defender, click the Turn On button.
The Windows Defender window will then display the PC status: Protected message
Opening Windows Defender
Use these steps to open Windows Defender:
-
From the Start screen, type Windows Defender to open the Search charm, and then select Windows Defender from the search results.
Figure : Search results for Windows Defender
-
The Windows Defender application opens.
Figure : Windows Defender opening screen
-
If Windows Defender detects potentially harmful or unwanted software, the names of the software, along with the details, display on the opening screen. Use this information to decide whether to remove or temporarily disable the software.
-
If Windows Defender does not detect potentially harmful or unwanted software, no action is required.
-
Scanning for malware
You can use Windows Defender to run a quick scan of your computer or a full system scan. If you suspect malware in a specific area of your computer, use Windows Defender to run a custom scan on individual drives and folders.
Figure : Scan options in the Windows Defender window

Running a quick scan
A quick scan checks the places on the hard disk drive that malware is most likely to infect.
To run a quick scan, click Quick, and then click Scan now.
When the scan is complete the screen displays the scan results.
Running a full scan
A full scan checks all files on your hard disk drive and all currently running applications. A full scan might cause your computer to run slowly until the scan is complete. If you suspect that malware has infected your computer, run a full scan.
To run a full scan, click Full, and then click Scan now.
When the scan is complete the screen displays the scan results.
Running a custom scan
By running a custom scan, you can select specific drives and folders on your computer for Windows Defender to scan. If Windows Defender detects potentially unwanted or malicious software, it then runs a quick scan so the detected items can be removed from other areas of your computer, if needed. To run a custom scan:
-
Click Custom, and then click Scan now.
A window opens requesting that you select the drives and folders you want to scan.
Figure : Drives and folders selection options in Windows Defender

-
Select the drives and folders to scan, and then click OK.
When the scan is complete the screen displays the scan results.
Selecting items to be included in a Windows Defender scan
Windows Defender allows you to include archived items and removable drives in a scan.
Including archived items
To include an archived file, such as a .zip or .cab file, complete the following steps:
-
Click the Settings tab, and then click Advanced from the left-hand pane.
Figure : Advanced selection in the Settings tab

-
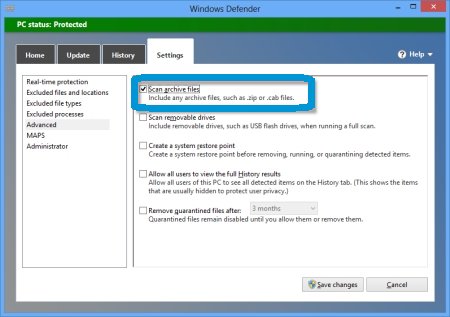
Click Scan archive files
Figure : Scan archive files selection in the Settings tab
-
Click Save changes.
Windows Defender will now include archived items in scans.
Including removable drives
To include removable drives, such as USB flash drives, when running a full scan, complete the following steps:
-
Click the Settings tab, and then click Advanced from the left-hand pane.
Figure : Advanced selection in the Settings tab

-
Click Scan removable drives.
Figure : Scan removable drives selection in the Settings tab
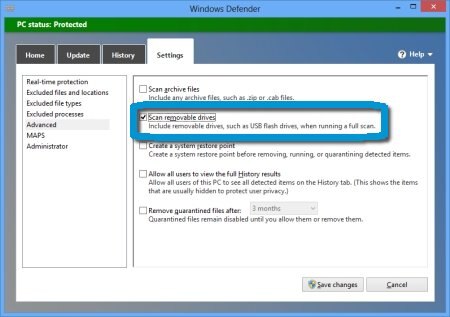
-
Click Save changes.
Windows Defender will now include removable drives in scans.
Selecting items to be excluded from a Windows Defender scan
To increase the speed of a scan, you can exclude specific files, locations, file types, and processes from a scan.
caution:Excluding items from a scan might leave your computer vulnerable to the latest malware.
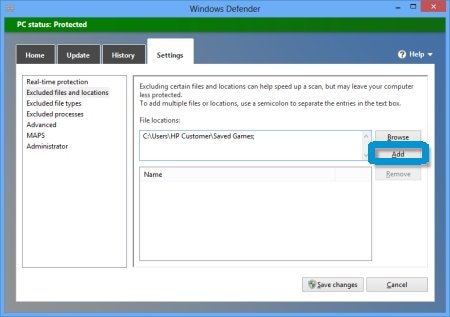
Excluding files and locations
To exclude files and locations from a scan, complete the following steps:
-
Click the Settings tab, and then click Excluded files and locations from the left-hand pane.
Figure : Excluded files and locations selection in the Settings tab

-
Click Browse, browse to the file or location you want to exclude, and click OK. In the following example screen, a Saved Games folder was selected.
Figure : Example – Saved Games folder

The selected files or locations display in the File locations box.
-
To select more files or locations, repeat the previous step.
-
Click Add.
Figure : Add button in the Settings tab
The files or locations that you selected display in the Name box.
Figure : Added file displayed in the Name field
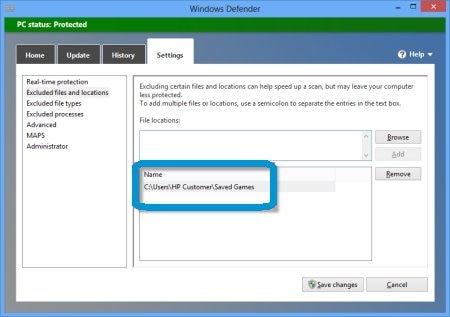
-
Click Save changes.
The selected files or locations will be excluded from the next scan.
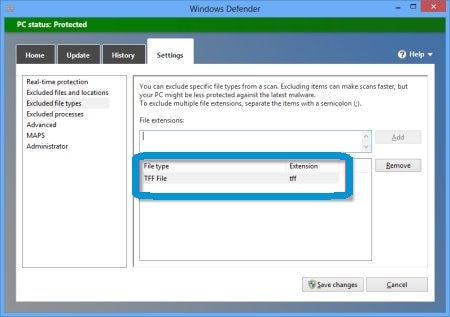
Excluding file types
To exclude file types from a scan, complete the following steps:
-
Click the Settings tab, and then click Excluded file types from the left-hand pane.
Figure : Excluded file types selection in the Settings tab

-
Type the file extensions in the File extensions box, and click Add. In the following example screen, .ttf file type was added.
Figure : Example – Exclude .ttf file types

The file types and extensions that you typed display in the File type and Extension columns.
Figure : Added file types and extensions displayed in the File type field
-
Click Save changes.
The selected file types will be excluded from the next scan.
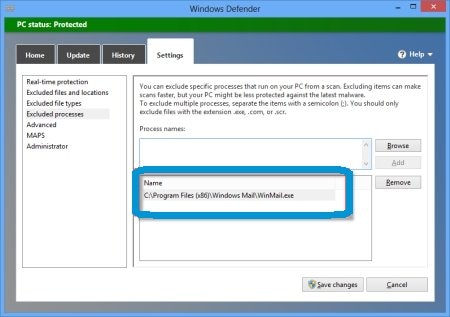
Excluding processes
To exclude processes from a scan, complete the following steps:
note:Exclude only files with the following extensions: .exe, .com, or .scr.
-
Click the Settings tab, and then click Excluded processes from the left-hand pane.
Figure : Excluded processes selection in the Settings tab

-
Click Browse, browse to the process you want to exclude, and click OK. In the following example screen, WinMail.exe process was selected
Figure : Example – Exclude WinMail.exe process

-
To select more processes, repeat the previous step.
-
Click Add.
Figure : Add button in the Settings tab

The files or locations that you selected display in the Name box.
Figure : Added file displayed in the Name field
-
Click Save changes.
The selected processes will be excluded from the next scan.
Removing malware
After Windows Defender scans your computer, it displays the results of the scan. If Windows Defender does not detect any harmful software, no action is required.
Figure : Scan completed message

If Windows Defender detects potentially unwanted or harmful software, you can ignore, quarantine, or remove each item that is detected. When you choose to quarantine software, Windows Defender moves it to another location on your computer, and then prevents the software from running until you choose to restore it or remove it from your computer. For more information, refer to Working with quarantined items.
Removing malware using the Defender scan results options
To remove malware, select the software application from the scan results window, and then click Remove.
The malware will be removed from your computer.
Removing malware using the Windows Uninstall option
You can also remove software that you suspect as malware using the Windows Uninstall option.
-
Press the Windows
 + Q key.
 Type the name of the software that you suspect as malware into the search field.
-
Right-click the software name on the list of results.
-
Click Uninstall at the bottom of the screen.
-
Read and respond to any messages that might open while the software is being removed from your computer.
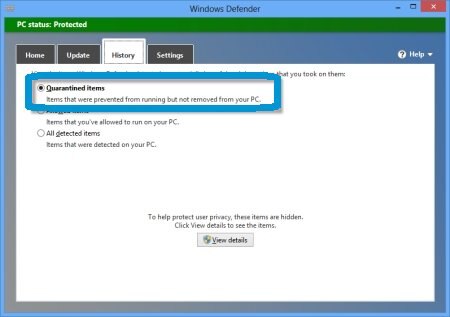
Working with quarantined items
Windows Defender moves quarantine software to another location on your computer, and then prevents the software from running until you choose to restore it or remove it from your computer. Windows Defender also provides an option to schedule the amount of time that passes before quarantined items are automatically removed.
Removing or restoring quarantined items
From the quarantined list, you can choose to remove this software from your computer or allow this software to run. Use these steps to view the quarantined items list:
-
Click the History tab at the top of the window, and then click Quarantined items.
Figure : Quarantined items in the History tab
-
Click View details to see a list of quarantined items.
-
Review each item, and then click Remove or Restore. If you want to remove all quarantined items from your computer, click Remove All.
If you are prompted for an administrator password or confirmation, type the password or provide confirmation.
The quarantined items have been restored.
warning:
Do not restore software with severe or high alert ratings. If allowed to run, these items can harm your privacy or the security of your computer.
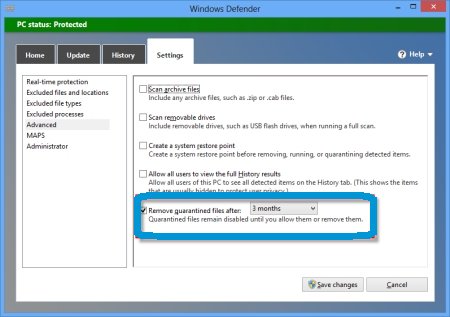
Automatically removing quarantined files
Quarantined items remain disabled until you allow them or remove them. You can schedule the amount of time that passes before a quarantined item is automatically removed.
To schedule the removal of quarantined items, complete the following steps:
-
Click the Settings tab, click Advanced from the left-hand pane, and then click the Remove quarantined files after box.
Figure : Remove quarantined files selection in the Settings tab
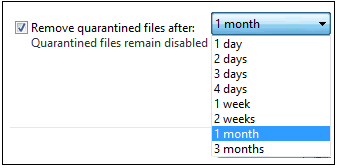
-
Click the arrow in the drop-down box, and then select the amount of time that passes before a quarantined item is automatically removed.
Figure : Remove quarantined files menu
-
Click Save changes.
Quarantined files will now be removed automatically from your computer.
Manually updating spyware, virus, and other malware definitions
Virus, spyware, and other malware definitions are files that Windows Defender uses to identify and notify you of any malicious or potentially unwanted software on your computer. To help keep these definitions up to date, Windows Defender works with Windows Update to automatically install new definitions as they are released. However, you can manually check online for updated definitions before scanning.
To manually update spyware, virus, and malware definitions complete the following steps:
-
Click the Update tab.
-
Click Update.
Figure : Update button in the Update tab

Windows Defender starts searching and downloading virus and spyware definitions.
Figure : Installing bar

When the search is complete and the new definitions are installed, a screen displays Virus and spyware definitions: Up to date message.
Figure : Up to date message

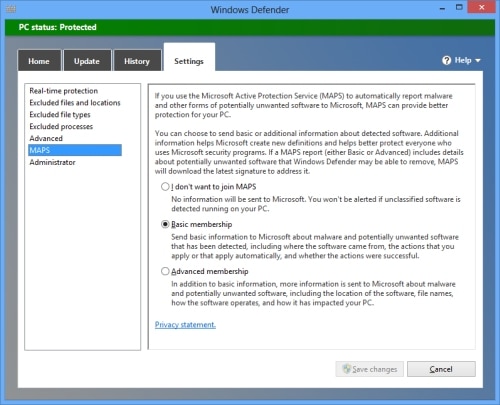
Using Microsoft Active Protection Services (MAPS)
The Microsoft Malware Protection Center (MAPS) allows you to automatically report malware and other forms of potentially unwanted software to Microsoft. On the MAPS page, you can choose one of the following options:
-
I don't want to join MAPS. If you select this option, no information will be sent to Microsoft, and you will not be alerted if unclassified software is detected on your computer.
-
Basic membership. If you select this option, basic information about malware and potentially unwanted software will be sent to Microsoft. This information includes where the software came from, the actions that you applied or that were automatically applied, and whether the actions were successful.
-
Advanced membership. If you select this option, basic information is sent to Microsoft along with the location of the software, file names, how the software operates, and how the software has impacted your computer.
Figure : MAPS selection in the Settings tab
How to Turn on Virus Protection in Windows 7
Source: https://support.hp.com/us-en/document/c03275183